My DIY Curly Cut: A Telenovela for My 4a/4b Hair (Ponytail Method Edition)
- Feb 12, 2025
- 3 min read

So y'all, I did a thing. I cut my own hair. Gasp! Listen, I know. DIY haircuts can be terrifying, especially on 4a/4b natural hair. But after combing out my locs, my hair was…well, in a state. Let's just say it lacked shape. It was all different lengths, and styling it was becoming a nightmare - my ends would snag, and hair wouldn't lay just right. Something had to be done. Enter: the ponytail method.
The Ponytail Method: My New Best Friend (Or Worst Enemy?)
If you're not familiar, the ponytail method is a way to DIY a layered haircut. You basically gather all your hair into a high ponytail, then snip the ends. The higher the ponytail, the more dramatic the layers. It's supposed to be easy, and that's exactly what I needed. I watched a bunch of Youtube videos to suss out the process, and it appeared to be easy-ish.
Here’s the breakdown:
Gather: Detangle and brush your hair (thoroughly!) and pull it into a high ponytail. Think unicorn.
Secure: Tie it TIGHT. You don't want any slippage.
Decide: How much do you want to chop? Use another hair tie to mark the spot. This is the SCARY part. My advice - start small, and make any necessary adjustments after.
Snip: Deep breaths. Cut straight across.
Release: And pray. Just kidding (mostly). Style as usual. I did a wash and go to see how the layers would fall in my go-to style.

My DIY Curly Cut Hair Journey: A Rollercoaster of Emotions
Okay, so here's the real tea. DIY haircuts on 4a/4b hair are not for the faint of heart. Especially when you've got some lingering thinning from combing out locs, like yours truly. Hair health is KEY here (let's be real it's ALWAYS key), because any thinning or breakage will affect how those layers fall. My front is also way thicker than the back, which added another layer of complexity.
Let me tell you, this whole DIY curly cut process was a journey. There were moments of pure hope, like, "Wow, this might actually work!" Then there were moments of sheer panic, like, "OMG, what have I done?!" And then, of course, the inevitable "crash out" moment where I just stared at my hair in the mirror, wondering if I'd made a huge mistake.
The Aftermath Of My DIY Curly Cut: Not Perfect, But Progress
After the initial shock wore off, I started to see…potential. The shape was definitely better, even though it wasn't perfect. Because of the thinning, I did have to go back in and clean things up a bit, evening out the layers and making sure everything looked cohesive. It wasn't salon-perfect, but it was me.
My Advice: Proceed with Caution (or See a Pro)
If you're thinking about trying this at home, please proceed with caution! If you're hesitant at all, seriously, just see your stylist. They know what they're doing. But if you're feeling adventurous (and maybe a little crazy, like me), then go for it! Just be prepared for the emotional rollercoaster.
Want to see all the drama unfold? I documented the entire DIY curly cut process on YouTube! Click here to watch my latest video and see all the highs, lows, and everything in between.
Let me know in the comments if you've ever tried a DIY haircut! I'd love to hear your stories (and commiserate if necessary!).
1
Searing the Beef
Sear beef fillets on high heat for 2 minutes per side to form a golden crust. Let it cool before proceeding to keep the beef tender.
1
Searing the Beef
Sear beef fillets on high heat for 2 minutes per side to form a golden crust. Let it cool before proceeding to keep the beef tender.
1
Searing the Beef
Sear beef fillets on high heat for 2 minutes per side to form a golden crust. Let it cool before proceeding to keep the beef tender.
1
Searing the Beef
Sear beef fillets on high heat for 2 minutes per side to form a golden crust. Let it cool before proceeding to keep the beef tender.
Notes


1
Season the good fresh beef fillets with salt and black pepper. Heat olive oil in a pan over high heat and sear the fillets for 2 minutes per side until it fully browned. Remove the beef from the pan and brush with a thin layer of mustard. Let it cool.
1
Season the good fresh beef fillets with salt and black pepper. Heat olive oil in a pan over high heat and sear the fillets for 2 minutes per side until it fully browned. Remove the beef from the pan and brush with a thin layer of mustard. Let it cool.
1
Season the good fresh beef fillets with salt and black pepper. Heat olive oil in a pan over high heat and sear the fillets for 2 minutes per side until it fully browned. Remove the beef from the pan and brush with a thin layer of mustard. Let it cool.
1
Season the good fresh beef fillets with salt and black pepper. Heat olive oil in a pan over high heat and sear the fillets for 2 minutes per side until it fully browned. Remove the beef from the pan and brush with a thin layer of mustard. Let it cool.
Instructions
Quality Fresh 2 beef fillets ( approximately 14 ounces each )
Quality Fresh 2 beef fillets ( approximately 14 ounces each )
Quality Fresh 2 beef fillets ( approximately 14 ounces each )
Beef Wellington
Beef Wellington
Fusion Wizard - Rooftop Eatery in Tokyo
Author Name
%20(1).jpg)
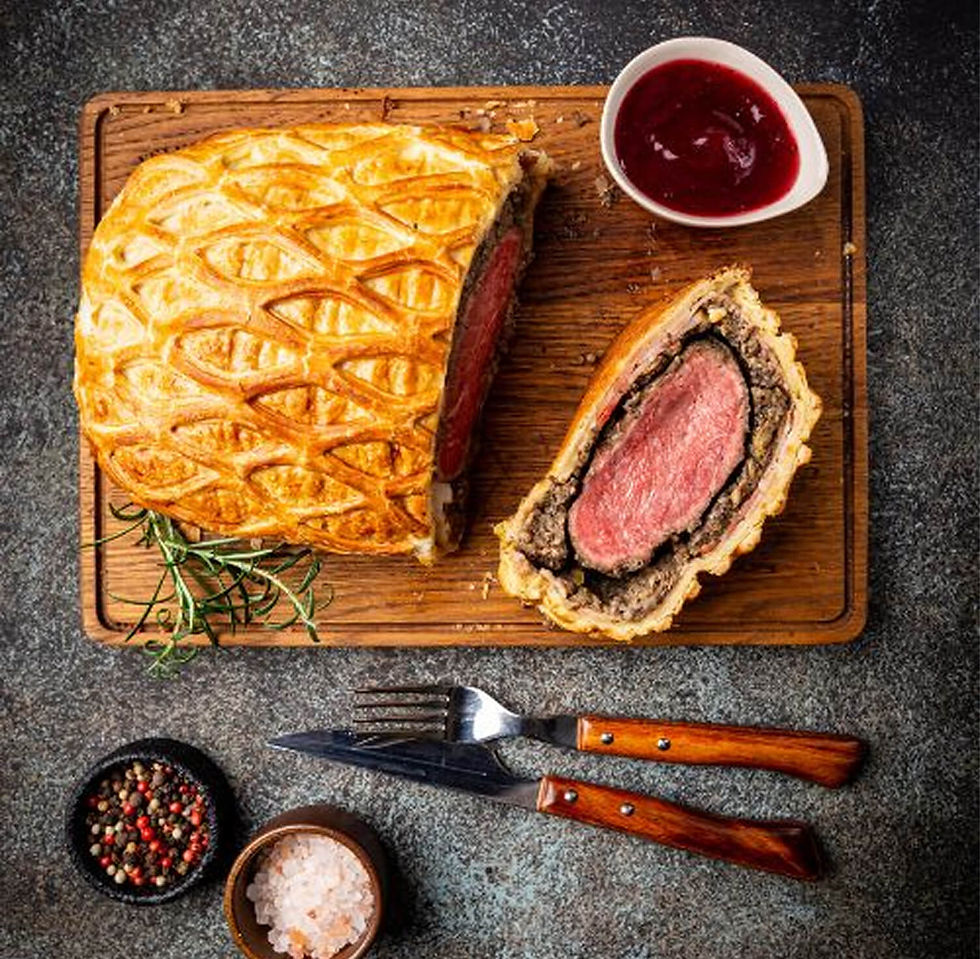
Beef Wellington is a luxurious dish featuring tender beef fillet coated with a flavorful mushroom duxelles and wrapped in a golden, flaky puff pastry. Perfect for special occasions, this recipe combines rich flavors and impressive presentation, making it the ultimate centerpiece for any celebration.
Servings :
4 Servings
Calories:
813 calories / Serve
Prep Time
30 mins
Prep Time
30 mins
Prep Time
30 mins
Prep Time
30 mins


Comments